


Best Performance Marketing Agencies for B2B SaaS Companies in 2026
Facebook App ads are a great way to drive installs and deeper funnel events for your mobile app. App campaigns allow you to promote your app across Facebook and Instagram. In this post, we will walk you through how to create your first app campaign through Facebook Ads Manager.

First, you’ll have to make sure you have a mobile app account on Facebook for Developers and that it’s connected to your Business Manager and ad account. (If not, you’ll need to create one here.) You’ll also need to implement both the iOS and Android SDKs (Software Development Kits) and add any app events that are important to your business objectives. This part can be very technical, so make sure you have developer support on hand if needed.
Second, you’ll want to make sure you have your Mobile Measurement Partner, or MMP, set up correctly in order to pass back information between Facebook and your MMP. (At JDM, we typically recommend Branch or AppsFlyer for clients looking for MMPs.)
With your app, SDKs, and MMPs successfully set up, you can accurately go beyond simple install data and track the actions people take within your app. Once the initial setup and configuration steps are completed, it’s time to set up your campaigns!
Creating Your First App Campaign
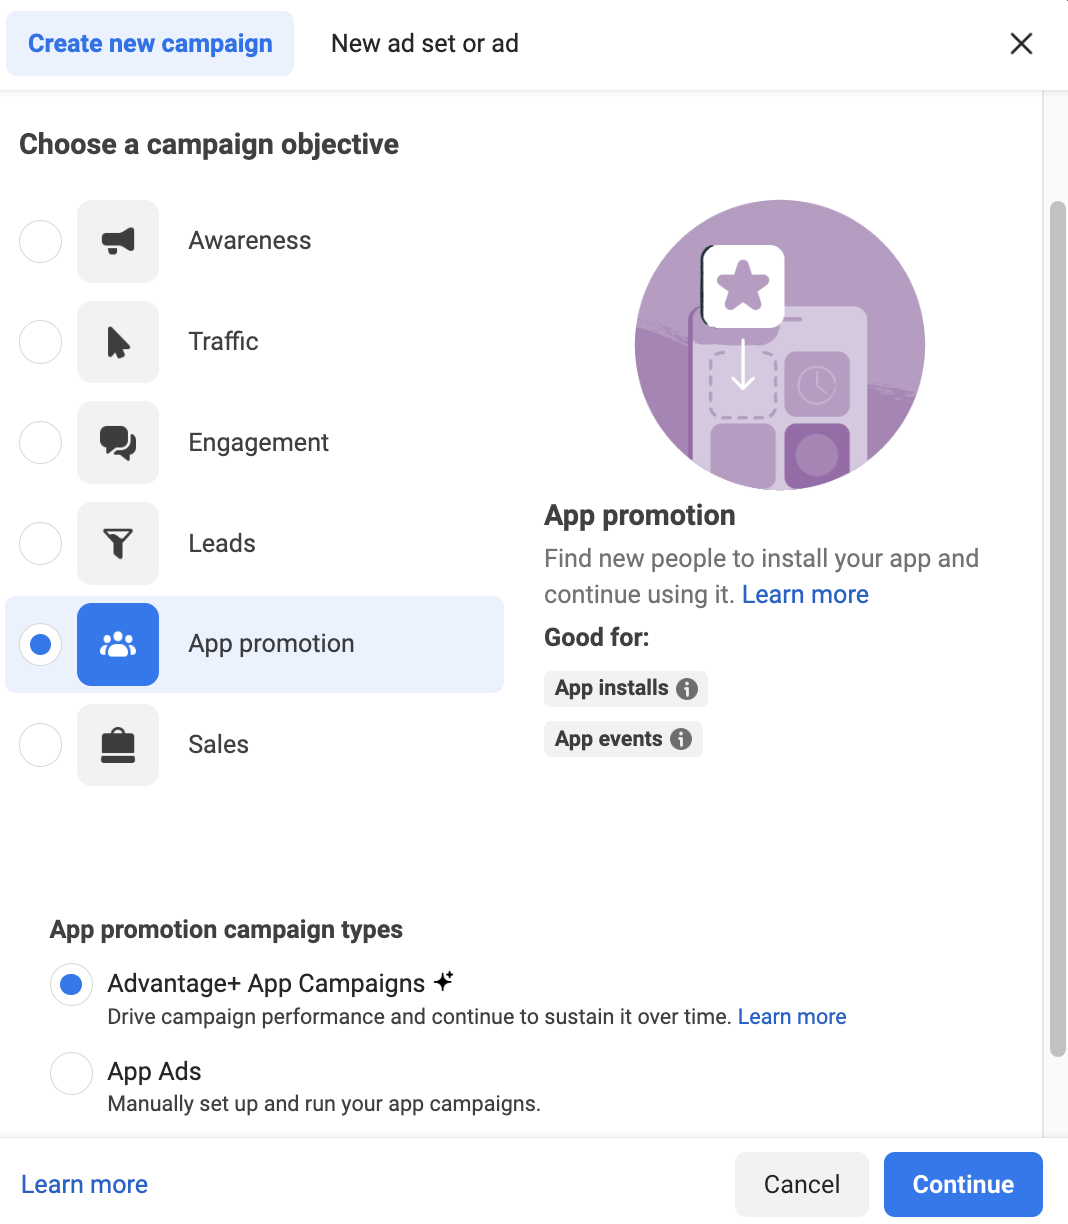
When creating an app campaign, you’ll want to choose the App Promotion objective - this will include the option for App Installs or App Events (conversions). If your app is available on both iOS and Android, you will need to create three separate campaigns (thanks to the iOS14 update in 2021):
- iOS14+
- iOS 13.7 and earlier
- Android
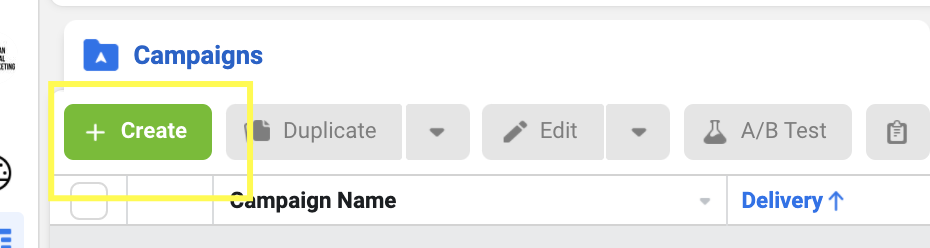
Click “+ Create” in the top left corner of your ads manager:
Then, choose the App Promotion campaign objective and choose your campaign type - Advantage+ App Campaigns (previously Automated App Ads) or App Ads. For the purpose of this walkthrough, we will use standard App Ads.
In Facebook, the setup for campaign objectives looks like this:
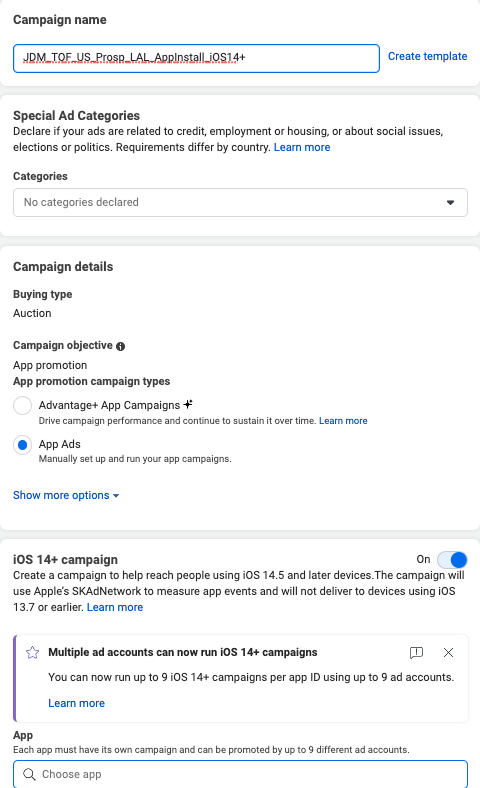
This is also where you name your campaign. At JDM, we typically use “JDM_TOF_US_Prosp_LAL_AppInstall_iOS14+” - this indicates the funnel stage, geo, audience type, type of campaign, and operating system (OS). Whatever naming convention you choose, remember that using a formulaic, repeatable naming structure will help streamline reporting for valuable insights.
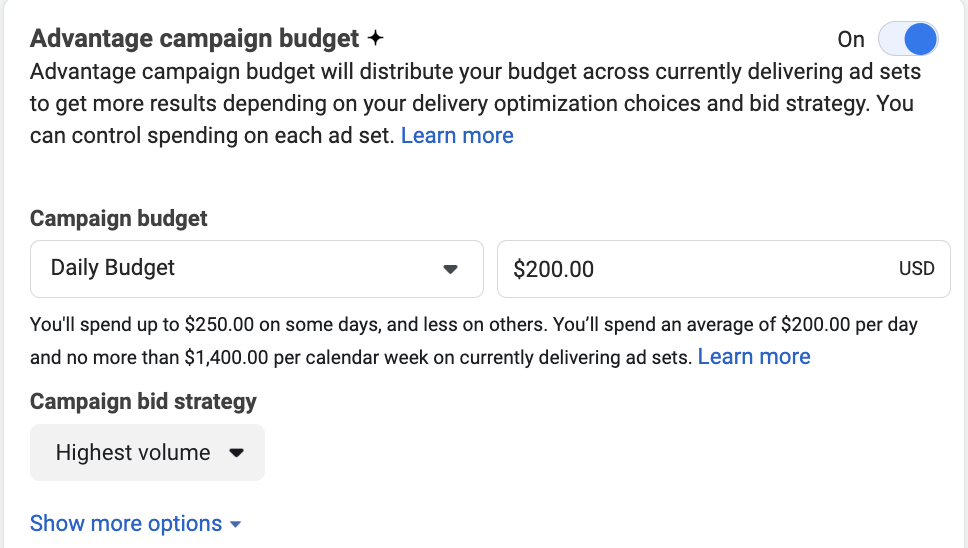
The next screen is where you’ll enter your campaign details and Advantage Campaign Budget+ (formerly Campaign Budget Optimization, or CBO) information. This includes the daily budget that the full campaign will optimize around - shared between all ad sets inside that campaign. We typically recommend that you use Advantage Campaign Budget for prospecting campaigns, as it gives Facebook’s algorithm the freedom to optimize your budget for top-performing audiences and ads.
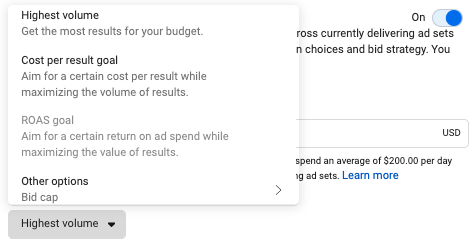
Here, you will also choose your campaign bid strategy. There are three choices:
- Highest Volume (formerly Lowest Cost): gets the most results for your budget
- Cost Per Result Goal (formerly Cost Cap): aims for a certain cost per result while maximizing the volume of results
- ROAS Goal (*NEW): aims for a certain return on ad spend while maximizing the volume of results
- Bid Cap: sets the highest you want to bid in any auction
Our go-to option is usually highest volume, which typically results in the best value and efficiency for your campaign in an efficient way. However, it’s always best to make sure your bid strategy aligns with client goals - for example, if they have a very strict CPA goal and are less concerned about volume, Cost Per Result Goal might make more sense.
Once you choose your strategy, you can click next and move on to the next page.
In the App section on the next page, choose the OS and app you want to promote. If your app is not linked to your ad account, your ad will automatically optimize for link clicks instead of app installs. Note: your campaign will be unable to optimize for any app events if you don’t first link your app to your ad account.
On this screen you will also choose your schedule, audience and placements. We typically recommend starting out with Advantage+ Placements (formerly automatic placements) to allow the algorithm to learn unrestricted. Once enough data is gathered, if there are any clear insights into placements that outperform or underperform, Manual Placements can be used for more control over where your ads are shown.
Note: If you are using Advantage+ Placements, be sure to optimize your creatives to fit both Feed placements (1:1) and Story or Reel placements (9:16).
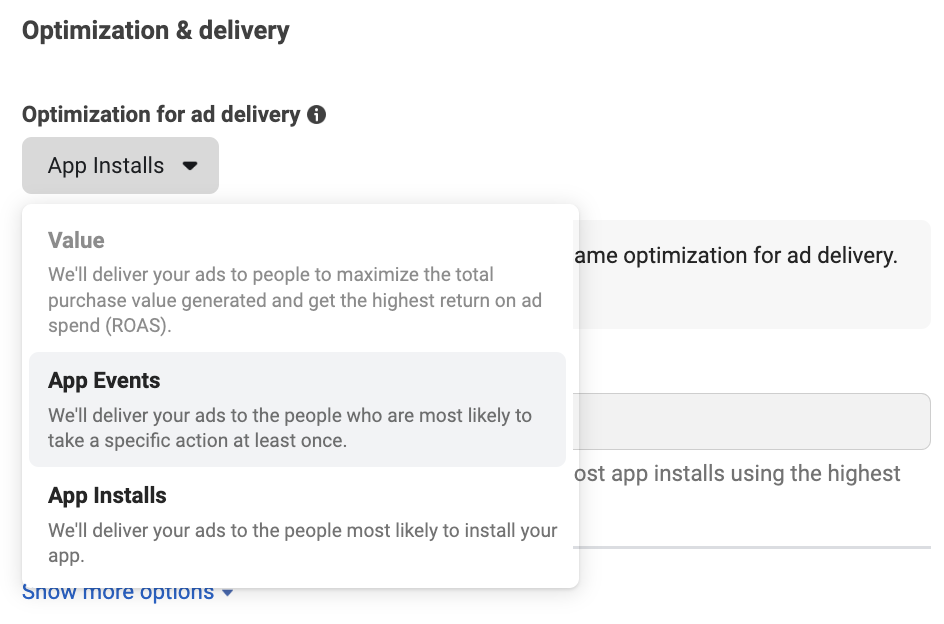
In the Optimization & Delivery section, choose your optimization goal. If you are looking to increase your downloads and installs, choose App Installs to optimize for people most likely to download your app. If you are looking to optimize around people who are most likely to take an action within your app, then choose App Events, which is the best option for marketers looking for people to make a purchase or registration within the app.
We suggest optimizing around installs to bring in volume, and then creating a separate campaign that will optimize around deeper funnel in-app events (which might include things like signups, add to carts, games played, etc.).
On the next page, it’s time to set up your ad!
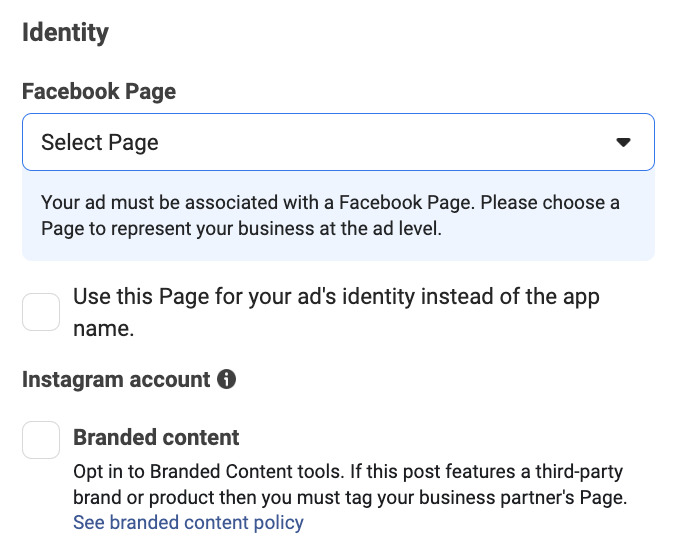
In the Identity section, connect your Facebook Page and attach your Instagram account if you have one.
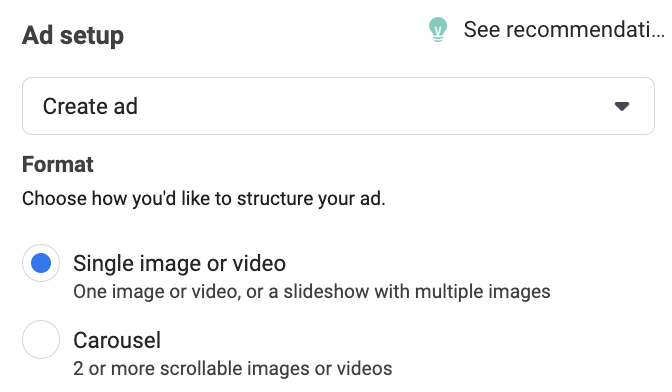
Under Ad Setup, choose the ad format you wish to use - Single Image or video, or Carousel to showcase multiple creatives that users can swipe through. (Note: We always recommend testing multiple ad formats and creatives to see what resonates best with your audiences.)
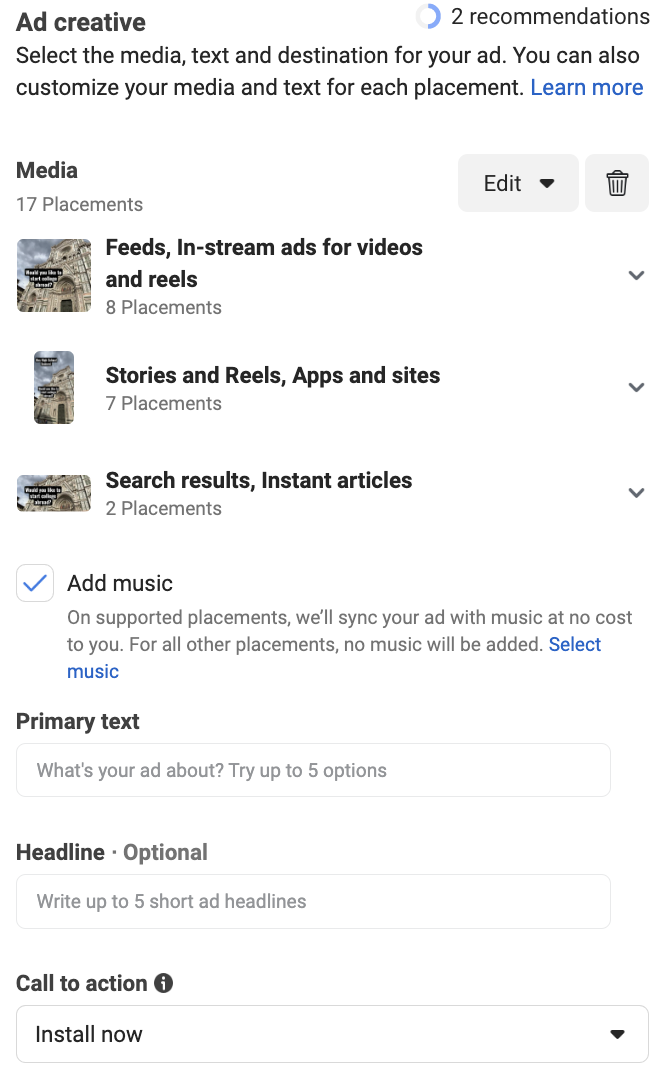
Upload your creative assets in the Ad Creative section, add in your desired ad copy, select a call to action (like Install Now), and you have the makings of your ad!
*Reminder: If using Advantage+ Placements, optimize your creative assets to fit properly for both Feed (1:1) and Story and Reel placements (9:16).
*There’s also a new option to add music (browse Facebook’s selection to choose from or let Facebook choose and automatically apply) to your ad for supported placements and formats (currently Instagram Reels - Carousel Ads).
Lastly, choose the destination for your ad (most likely your app), and enter any tracking parameters necessary. Once done, click publish.
Voila! You have just launched your first app campaign. If you’ve set up everything correctly, you should have quality data coming in from your campaign that will help you effectively optimize to your desired outcomes.
Want to work with a team of Paid Search experts? Request an Audit from Jordan Digital Marketing today!


Natalie Hanson has been in the digital marketing field since 2015, with stints at Competitor Group and SmashTech before joining JDM in Dec. 2020. She has extensive experience with paid social advertising and excels in direct-response strategy underpinned by rigorous testing and data-driven performance creative. Natalie works remotely from the Sacramento area, where she partakes in all manner of outdoor activities including running, volleyball, and beach lounging.


