


How Should a B2B SaaS Company Set Its Marketing Budget?
Accurate conversion tracking is the backbone of any successful online advertising campaign. It ensures that you can measure valuable user engagements, manage budget efficiently, and find actionable trends over time.
Proper conversion tracking paired with LinkedIn’s targeting options allows you to easily gauge the effects of your engagement with your ideal audience. Getting tracking up and running correctly can feel a bit daunting, so we created this step-by-step guide to make it a breeze!

Install the Sitewide Insight Tag
LinkedIn’s Sitewide Insight Tag is a piece of code that will allow advertisers to track the success of their campaigns, retarget audiences, and learn more about website visitors. You’ll need to implement the tag on all pages of a website in order to properly track conversions and ensure accurate reporting.
The code can be installed directly on the website, or by using a tag manager.
The easiest path will be using a tag manager, such as Google Tag Manager (GTM), Adobe Tag Manager, or others. Here’s how to install it with GTM.
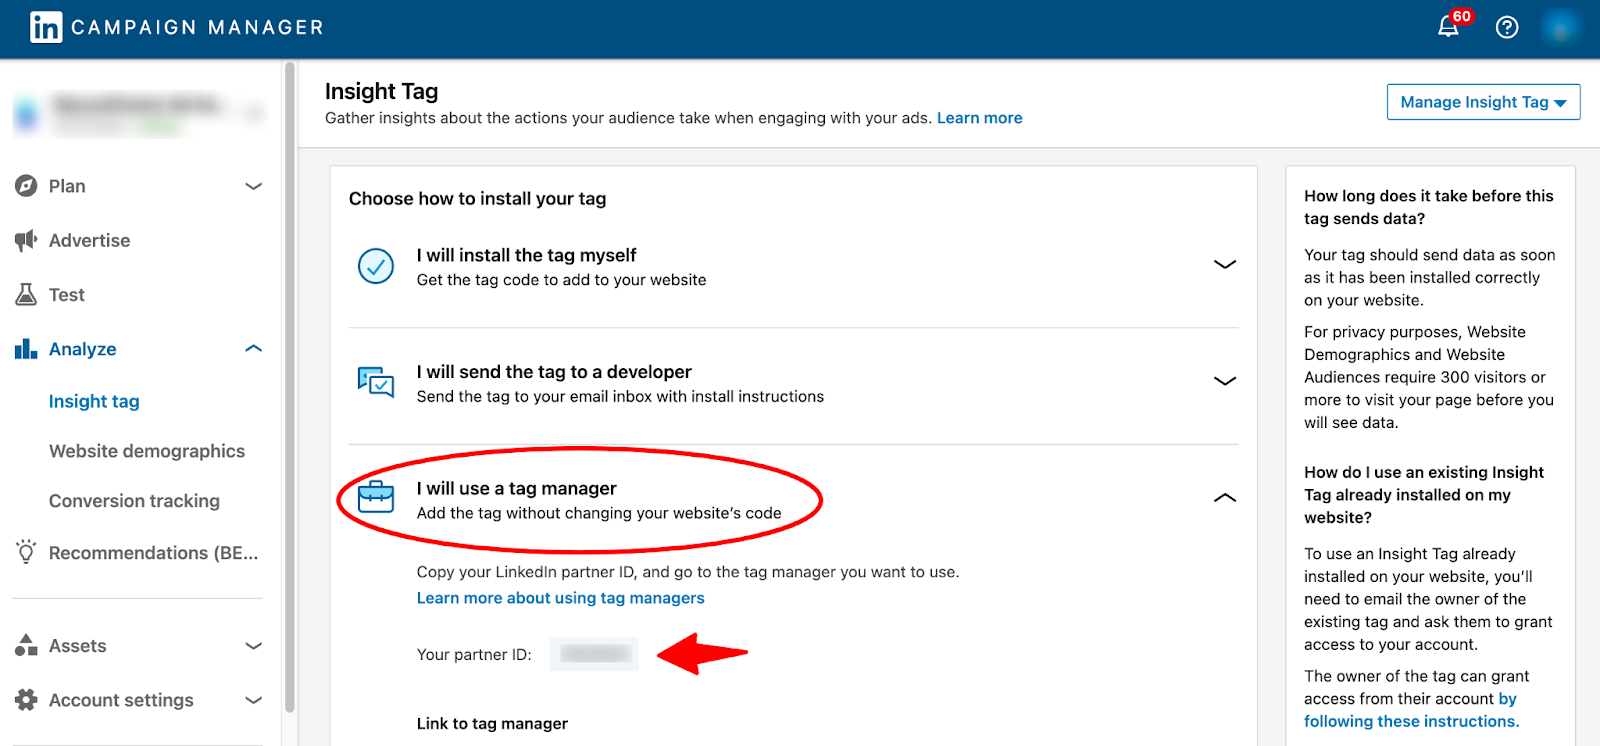
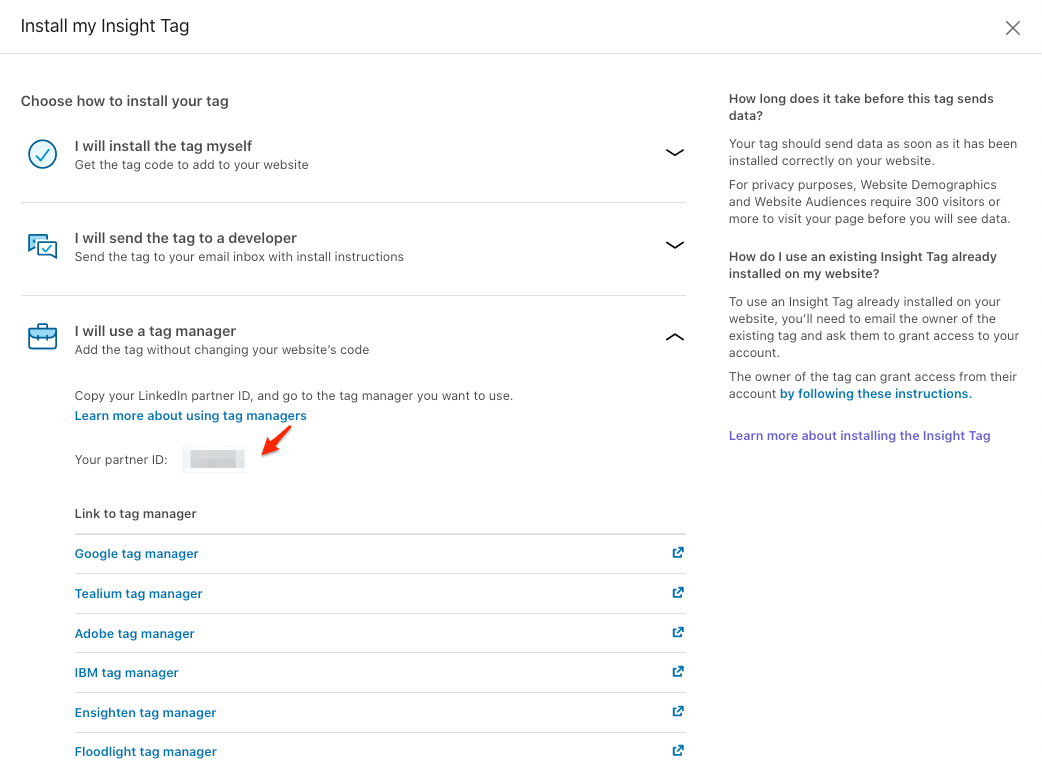
In LinkedIn Campaign Manager, navigate to Analyze → Insight Tag. On the next page, click the “I will use a tag manager” drop-down:
Open GTM in a new tab, then click New Tag.
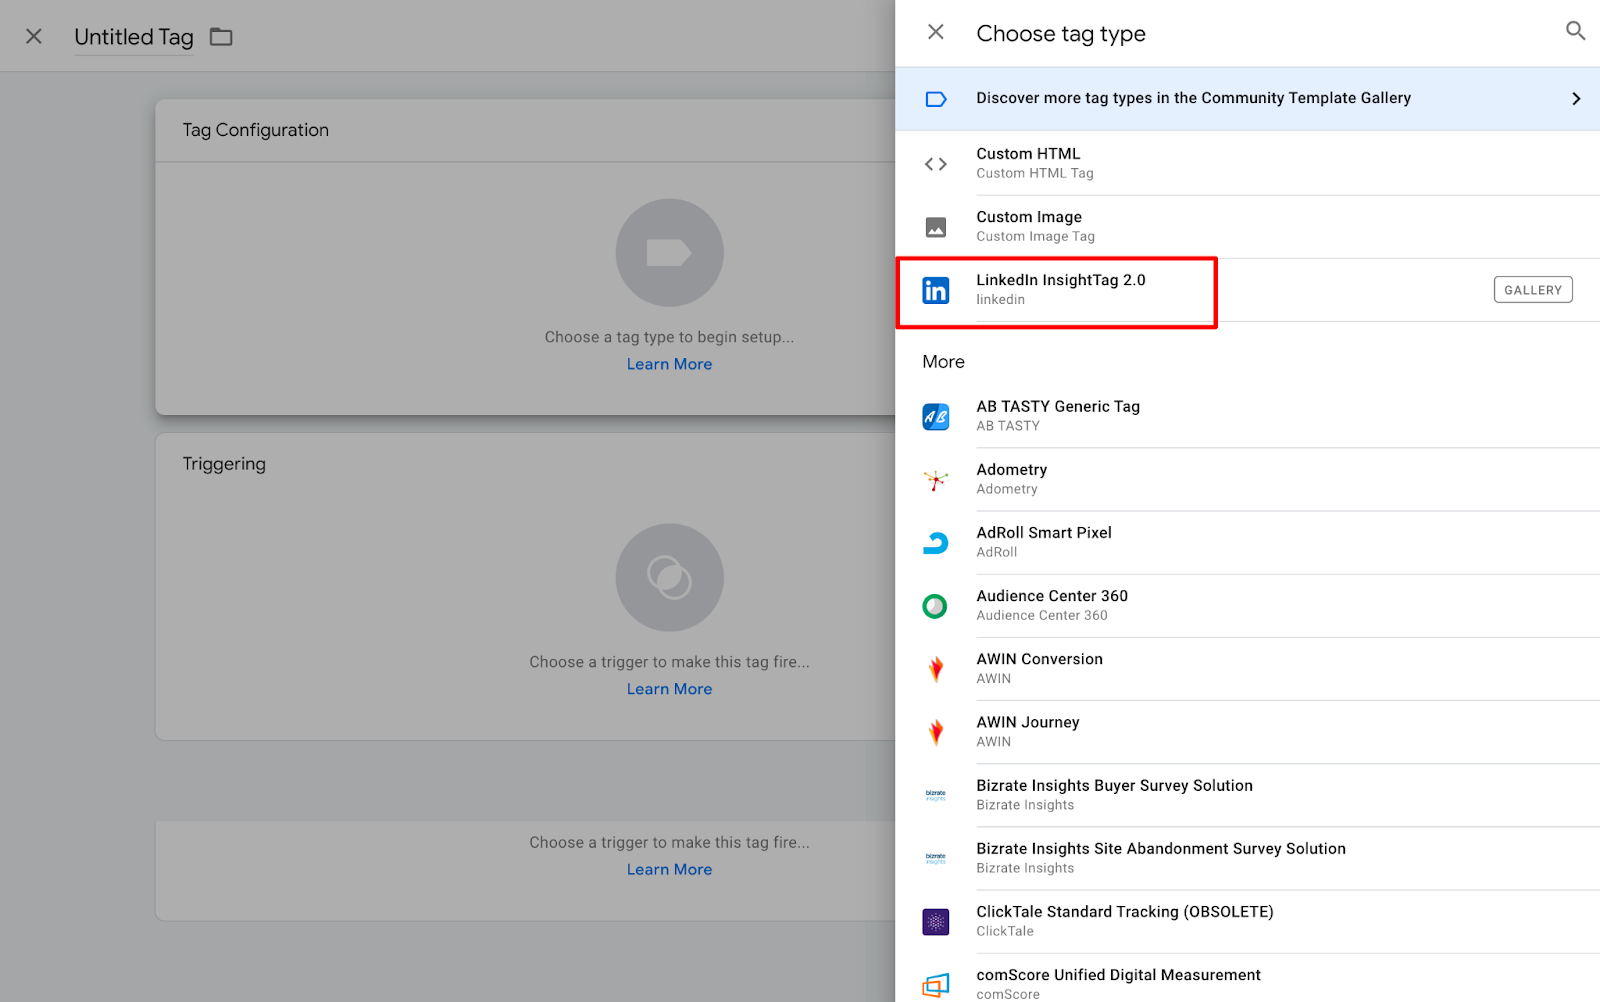
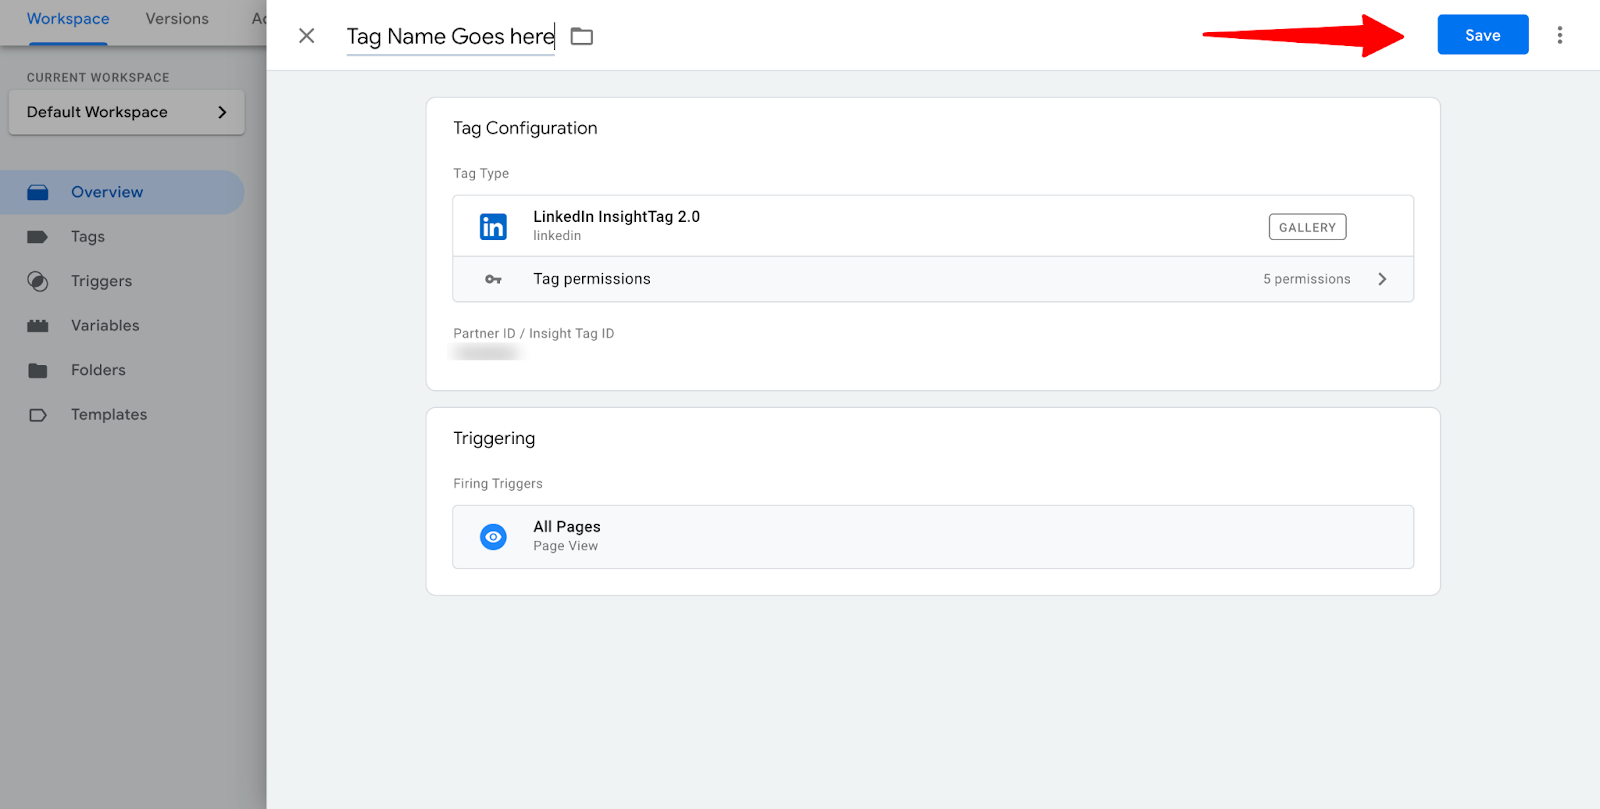
Name the tag, then click on Tag Configuration.
Under Choose tag type, scroll down to the LinkedIn Insight 2.0.
GTM will prompt you to add the Insight Tag ID, which can be found on the LinkedIn Insight Tag set up page under “Your Partner ID.”
Enter the Tag in GTM:
After entering the ID, click on Triggering.
Under Choose a trigger, click All Pages. Name your tag at the top of the page, Then click Save.
Submit and Publish the changes in GTM.
The next step is to create the conversion.
There are two ways to create a conversion on LinkedIn:
- Using the Insight Tag and the final URL a user lands on post-conversion
- Using an event-specific pixel to track form completions, button clicks, or other events
Create Conversions Using the Insight Tag
If the conversion being tracked has a unique URL, such as a Thank You or Confirmation page, set up conversions using the Insight Tag.
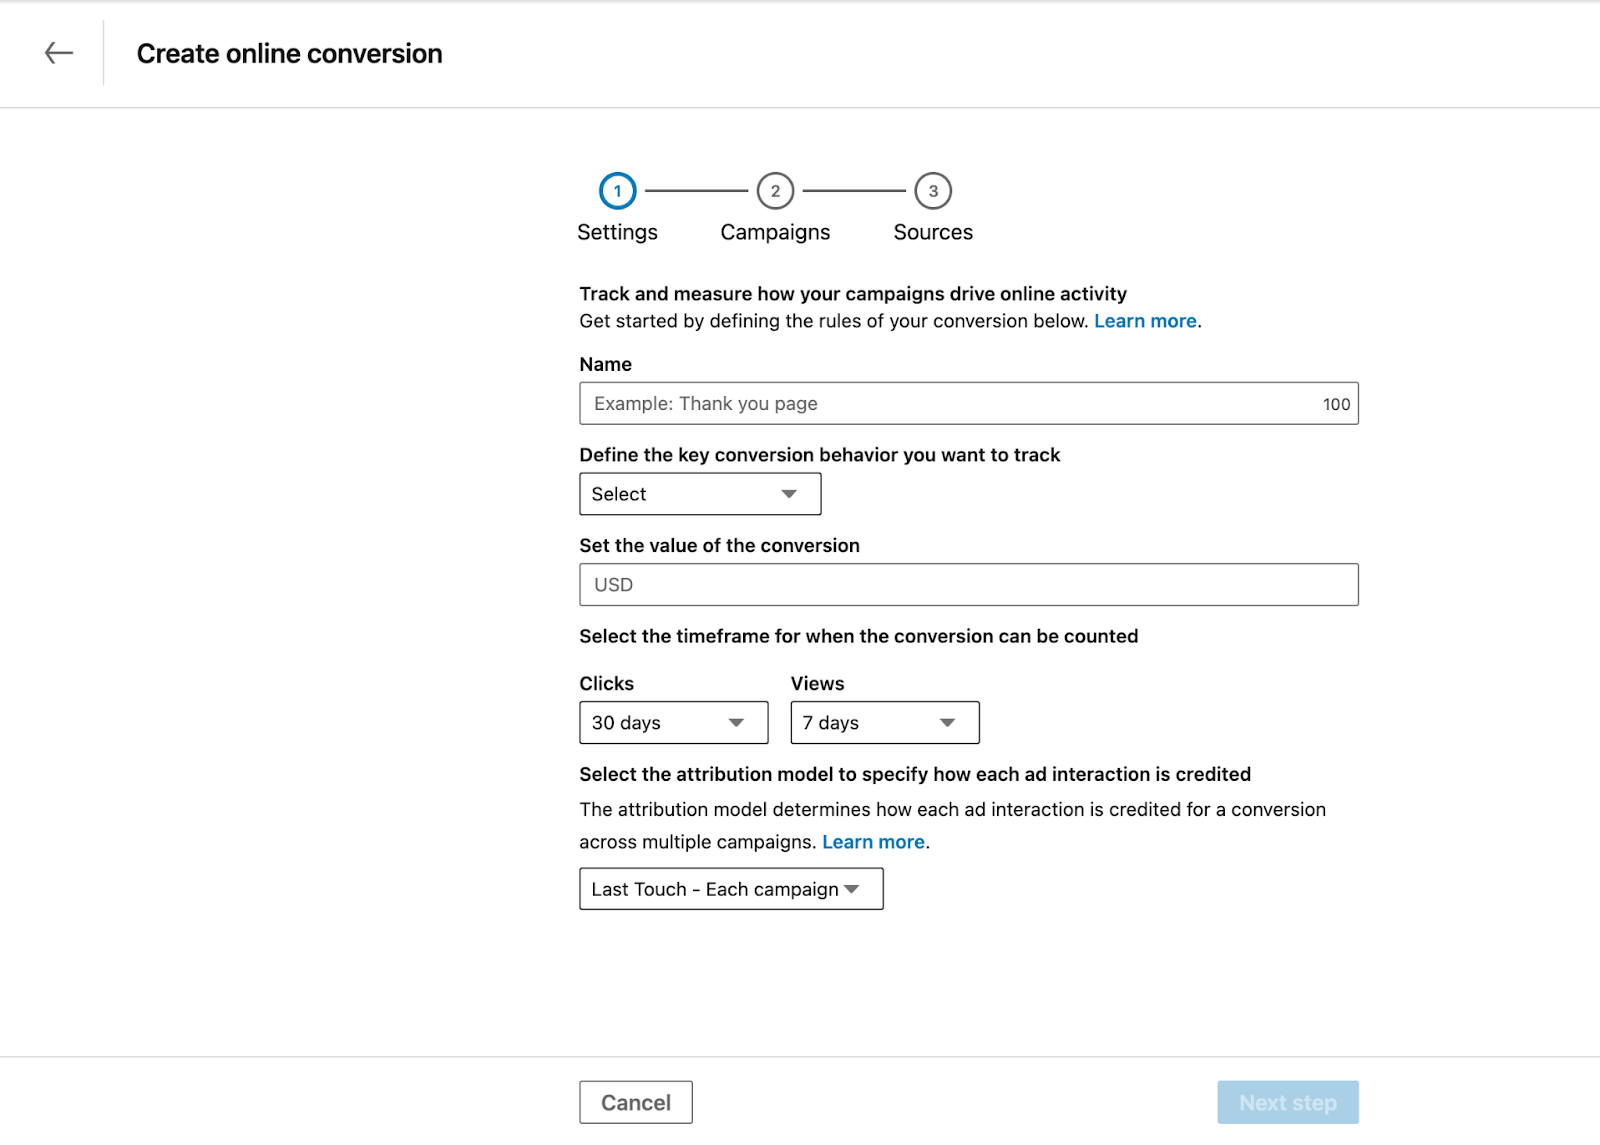
In LinkedIn Campaign Manager, navigate to Analyze → Conversion tracking. Click the “Create a conversion” button and choose “online conversion” from the drop down.
On the following pages, name the conversion, define your rules, and select the campaigns you want tracked.
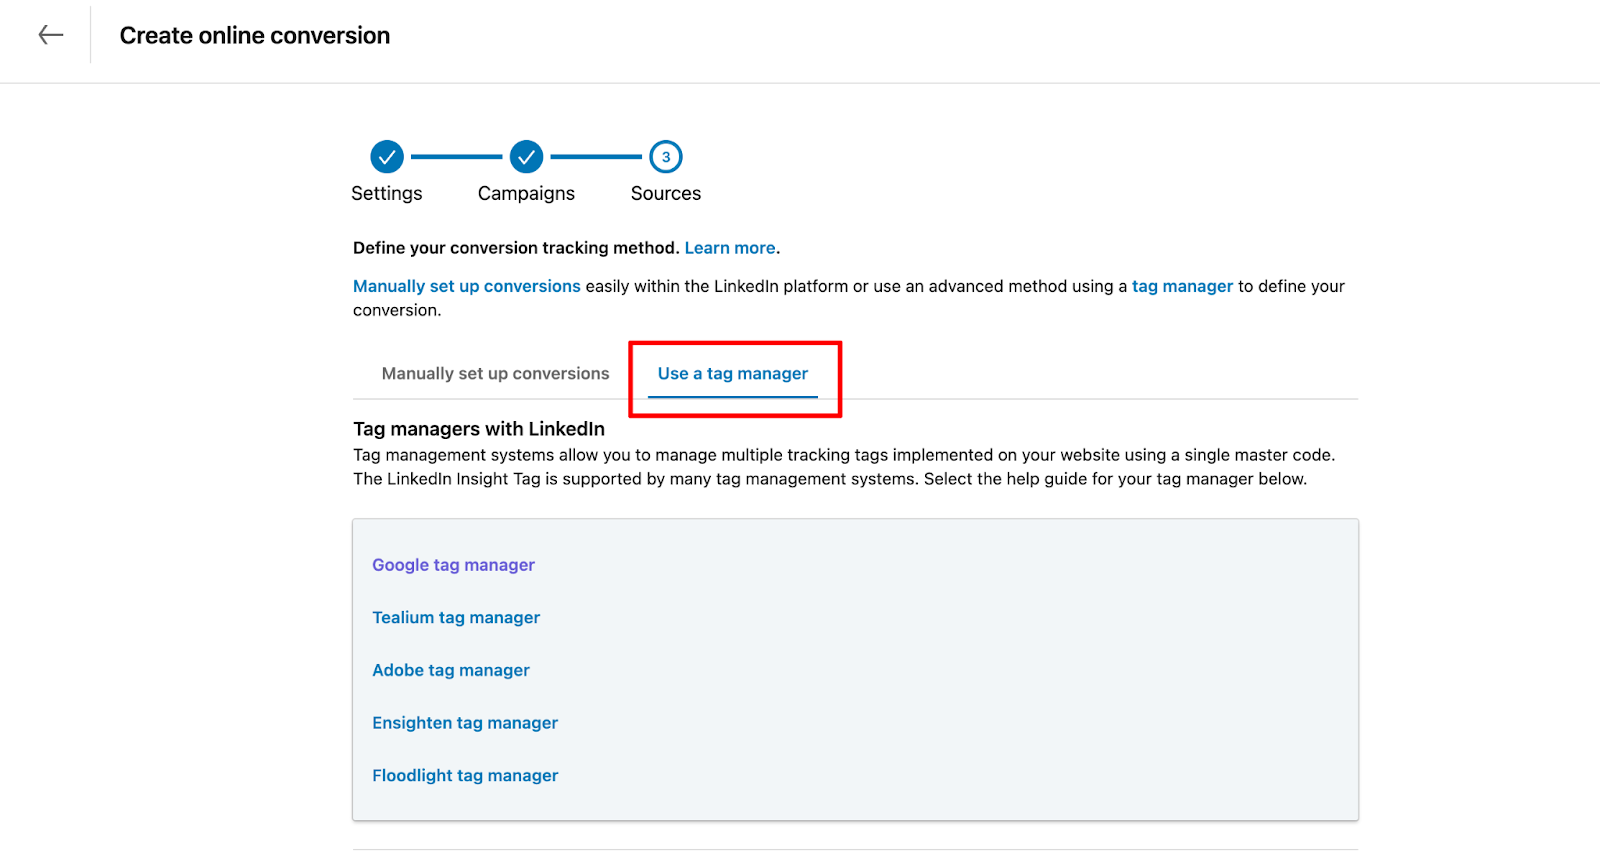
On step 3, select “Use a tag manager”:
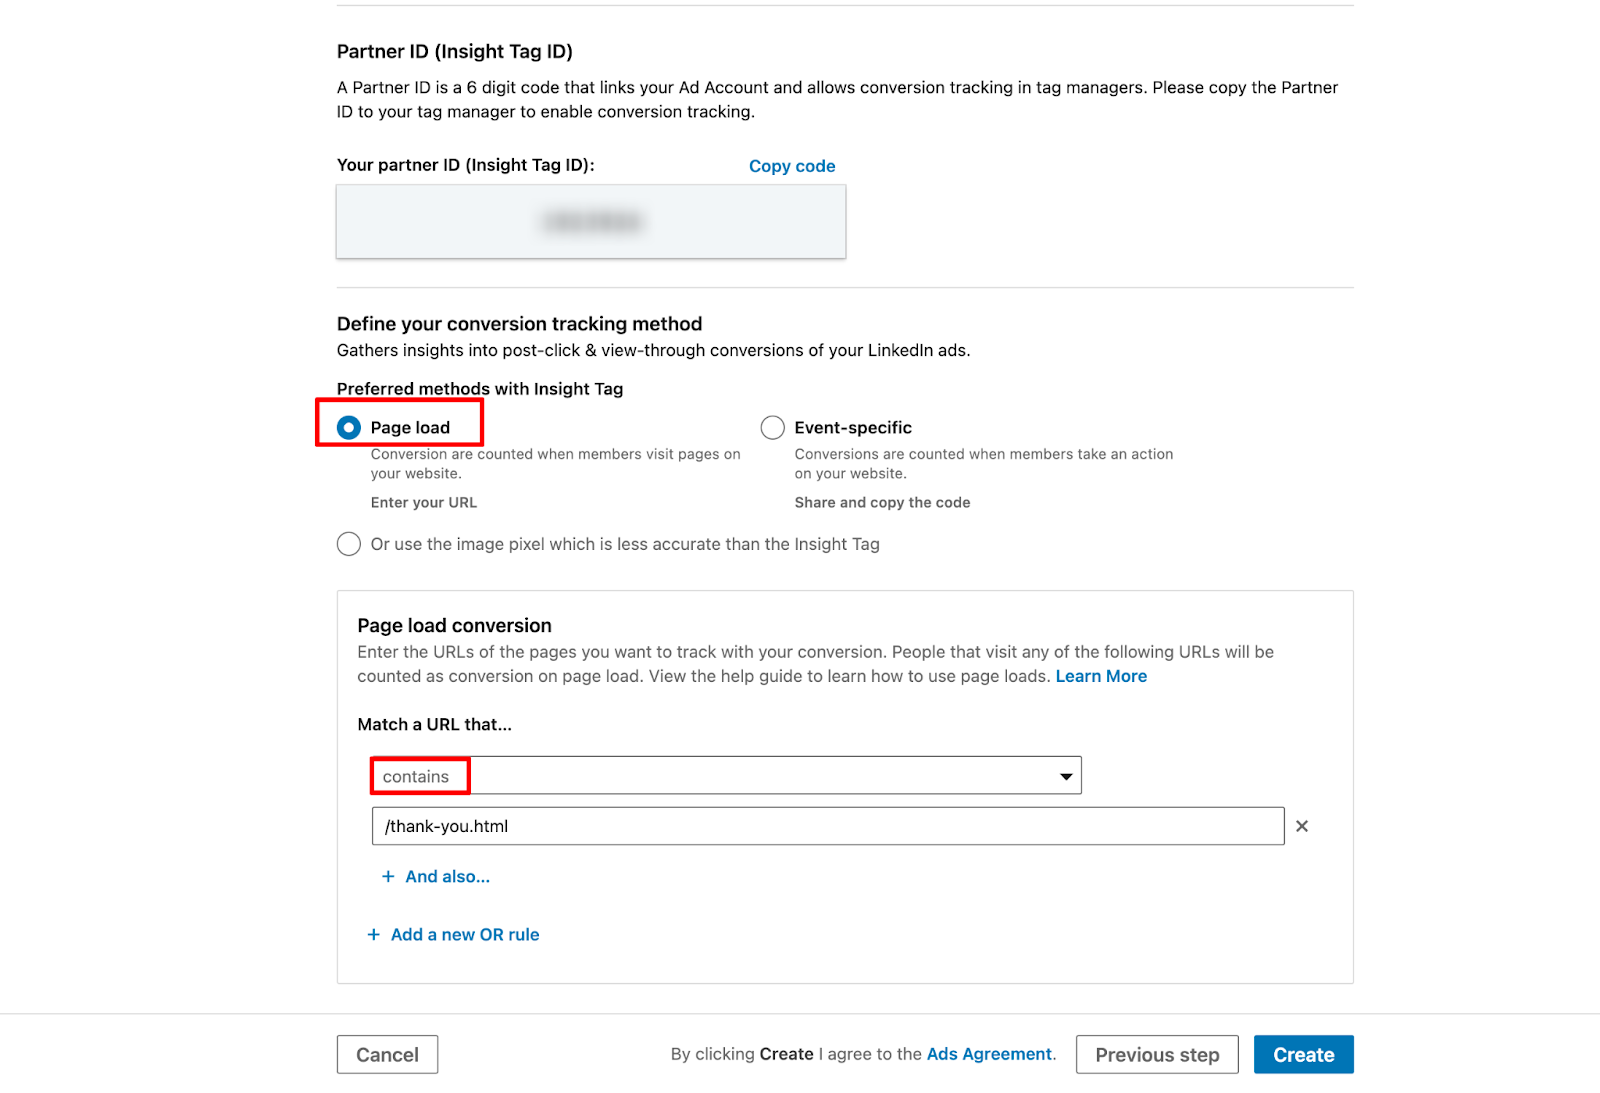
Since you have already created your tag in GTM, scroll to the bottom and select “page load”. If entering the path, double-check that the URL “contains” what is entered, not “starts with” or “equals”.
Click “Create.”
Create Conversions Using the Event-Specific Pixel
If you need to set a conversion event to fire once someone clicks a button or fills out a form, you’ll need to use an event-specific pixel. Here’s how to set this up on a button click with GTM.
In LinkedIn Campaign Manager, navigate to Analyze → Conversion tracking. Click the “Create a conversion” button and choose “online conversion” from the drop-down.
On the following pages, name the conversion, define your rules, and select the campaigns you want tracked.
Choose the event-specific pixel option.
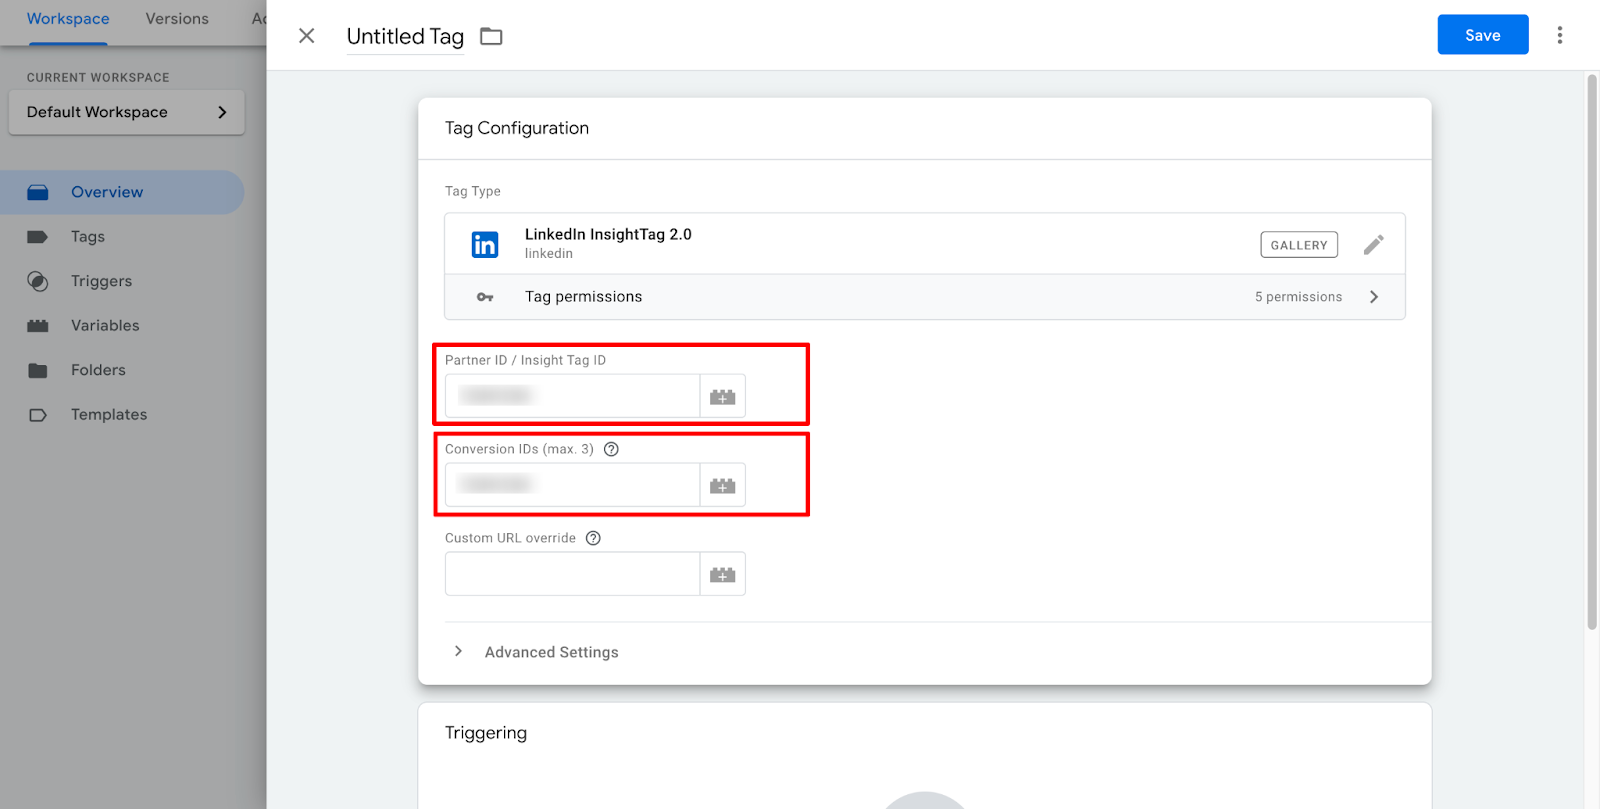
On this page, you’ll see your Partner ID and Conversion ID. you'll need both for the next step on GTM.
In a new tab, open GTM and create a new tag. Name the tag (e.g.: sign- up button click)
Click Tag Configuration, then scroll down and choose LinkedIn 2.0.
Copy and paste Your “Partner ID” as well as the “conversion ID” from LinkedIn.
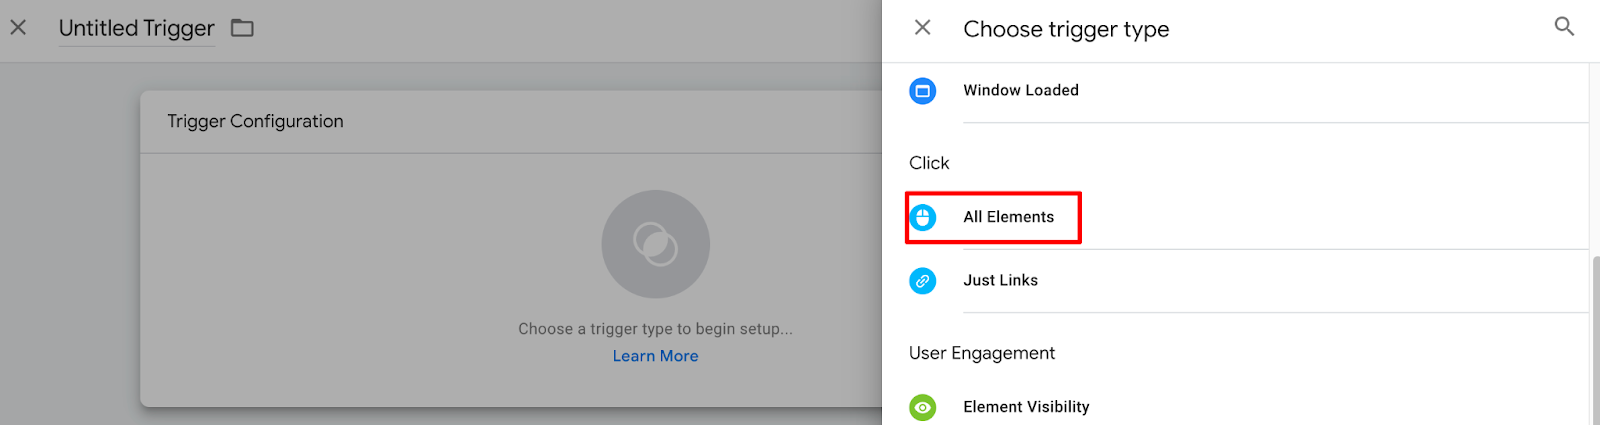
Click on Triggers, then create a new Trigger by clicking on the + button on the upper right corner.
Name the trigger. Click Trigger Configuration.
Choose Trigger Type → Click → All Elements. This will track clicks on any element on a page, including links, images, buttons, etc.
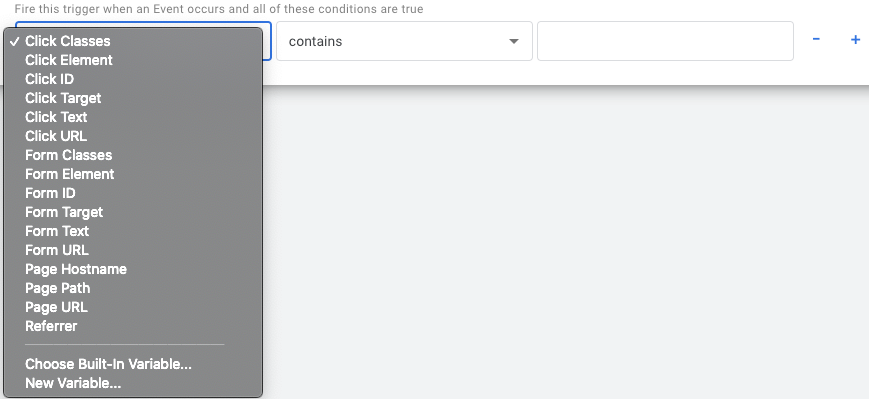
Set the Trigger to fire on Some Clicks. You’ll be able to specify what specific page variable needs to be clicked in order for it to fire.
Under the drop-down, you can choose what it needs to fire on.
Find the Click Trigger
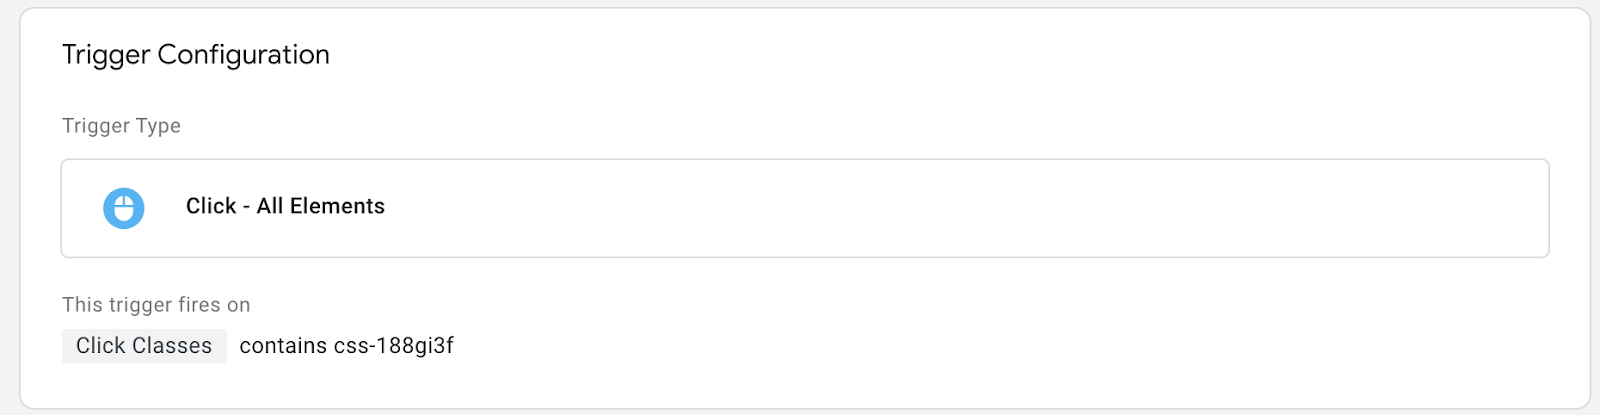
To find your Click trigger, right-click on the button you want the pixel to fire on and select “Inspect.”
Look for the button code and see if you can find a trigger that makes sense.
For example, if it says “button class,” then the trigger will be “Click Classes” and you would enter whatever is between the quotation marks. Or, if there’s a unique URL tied to that button, then you could use “Click URL.”
Click Save. Keep in mind GTM might not recognize all of these triggers, so set aside some time for testing and troubleshooting.
Test the Conversions
Submit and Publish the changes in the GTM account.
Test the conversion by completing the conversion action on your website.
Then check in the Conversions dashboard under Website tracking in LinkedIn to see when the Last Signal was received.
There can be a delay, so if you don’t see it showing up right away, check back later.
Now your tracking is ready to go!
Once your ads have launched, LinkedIn provides a ton of other useful analytics, including audience-level reporting. And if you’re looking for other B2B channels with lower engagement costs, check out this TikTok Advertising for B2B guide.
Have any questions about setting things up or want help managing LinkedIn campaigns? Reach out to us. We’re here to help!